To access 8x8 Phone App for Teams, go to your Teams app, click three dots lower menu, search for "phone" (see image below). Click to add 8x8 Phone App to your Teams. Follow prompts to sign in using your Microsoft SSO account. Once added, remember to pin app to your Teams menu.

8x8 Phone App for Teams Demo:
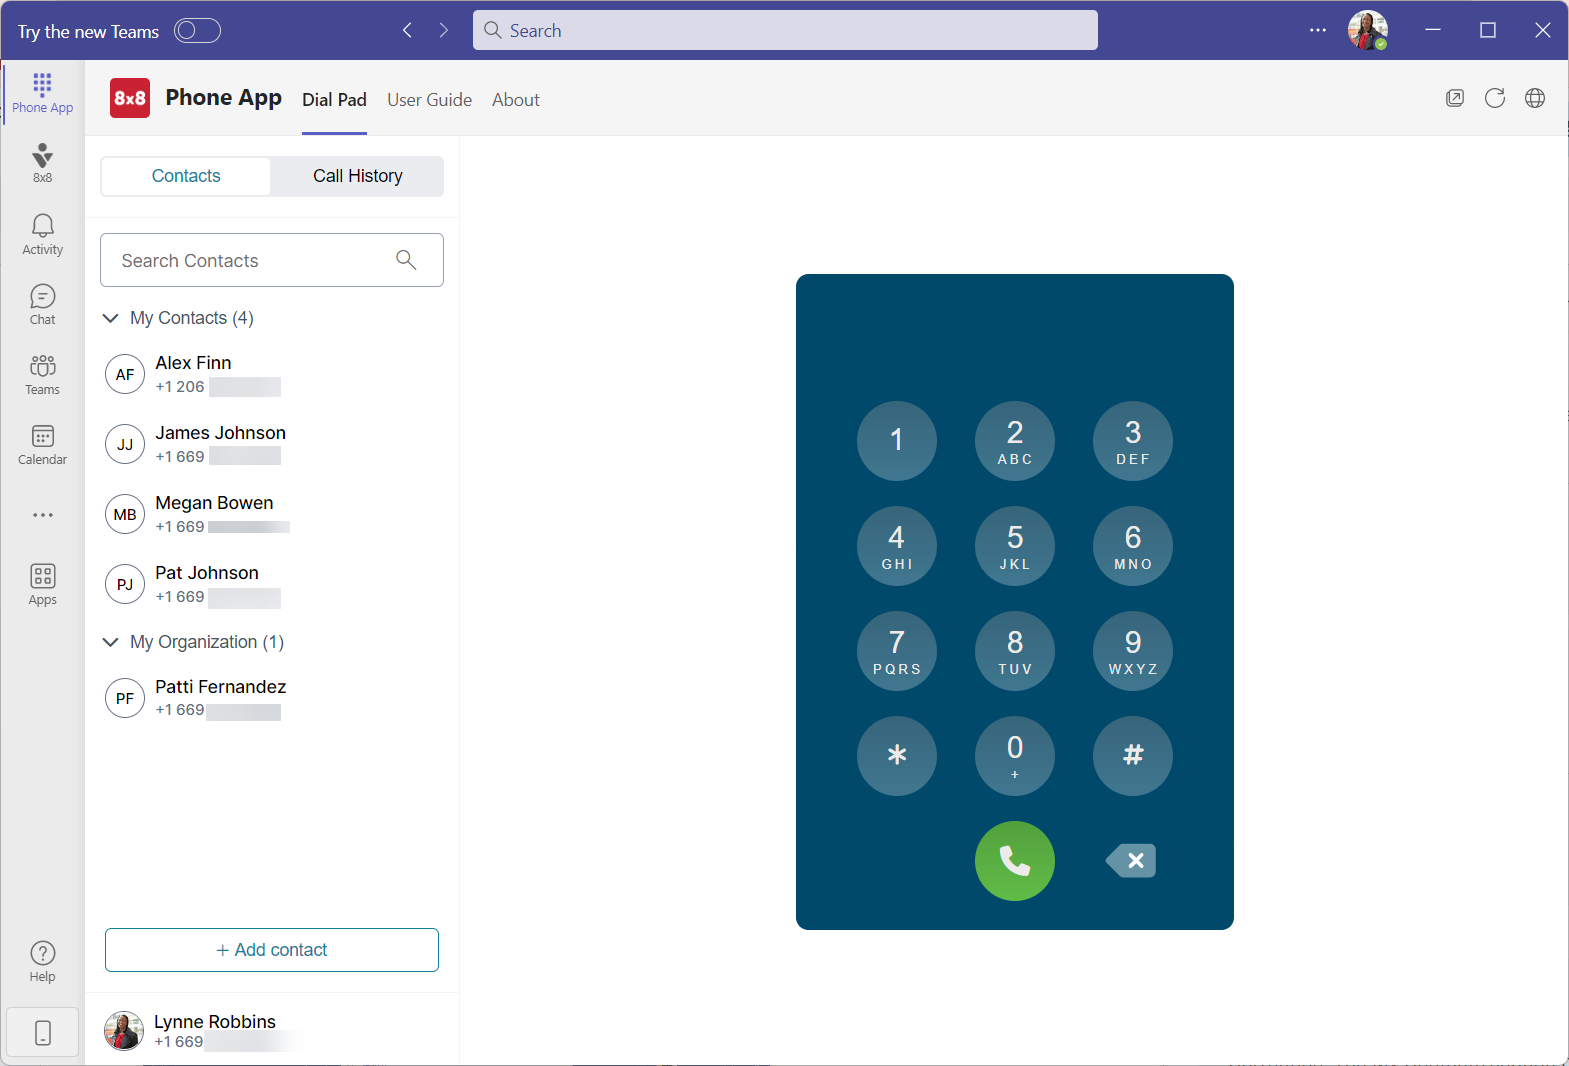
Tour the 8x8 Phone App for Microsoft Teams interface
Once you have been granted access to the 8x8 Phone App for Microsoft Teams, launch the Microsoft Teams app, then locate 8x8 Phone App ![]() in the navigation menu (Teams app bar).
in the navigation menu (Teams app bar).
In 8x8 Phone App for Microsoft Teams, you can access the following:
- Dial Pad: Manually add the phone number you want to dial.
- Active Calls: View all active calls. While on a call you can Hold/Resume, and Transfer an active call using the native Teams call window.
- Contacts & Search Contacts: Select a contact, search for one saved to your user profile pin or unpin them, and add/edit/delete contacts within Phone App.
- Call History: View the call logs. From this section, you can search the call history, view all calls, view incoming, outgoing, or missed calls. The call history retention period is 12 days, with a storage capacity of up to 100 calls.
Handle calls
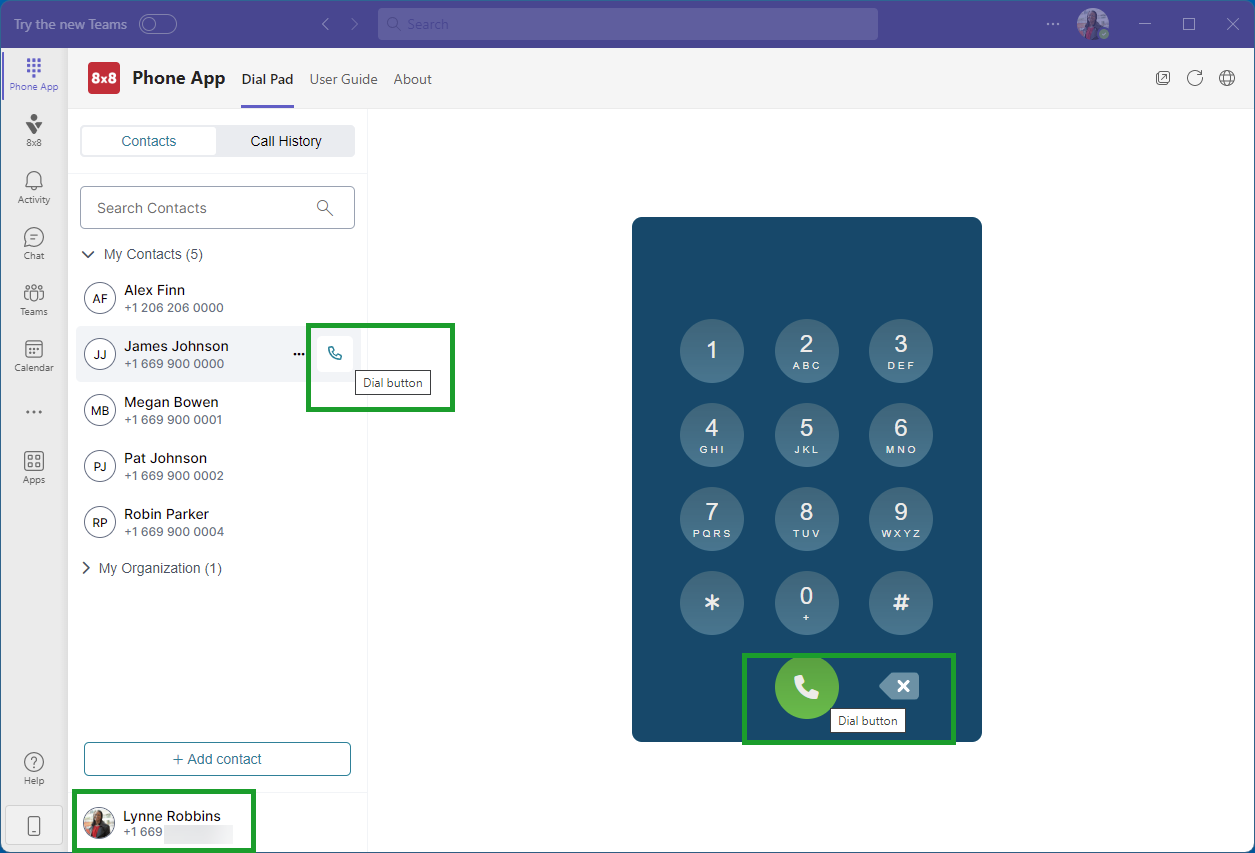
8x8 Phone App for Microsoft Teams gives you a flexible PSTN calling experience and enables you to call contacts directly from the contacts list using the Dial ![]() button. You can also place PSTN calls to external contacts using the dial pad.
button. You can also place PSTN calls to external contacts using the dial pad.
Note: Your calling number is listed at the bottom of the Dial Pad tab.
Place calls
As an 8x8 Phone App for Microsoft Teams user, you can place PSTN calls to external users. The call experience includes two legs—an inbound call which you answer, followed by the outbound call to the destination party.
To call an external user:
- Go to Phone App
 > Dial Pad, and manually enter the phone number in the dial pad.
-OR-
Go to the Contacts section, and search for the desired contact.
Note: You can also call numbers you previously contacted from the history section.
- Click the Dial
 button.
- From the inbound call pop up, click Answer call.
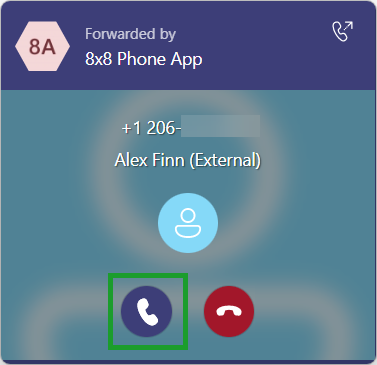
The call will launch in a native Teams call window.
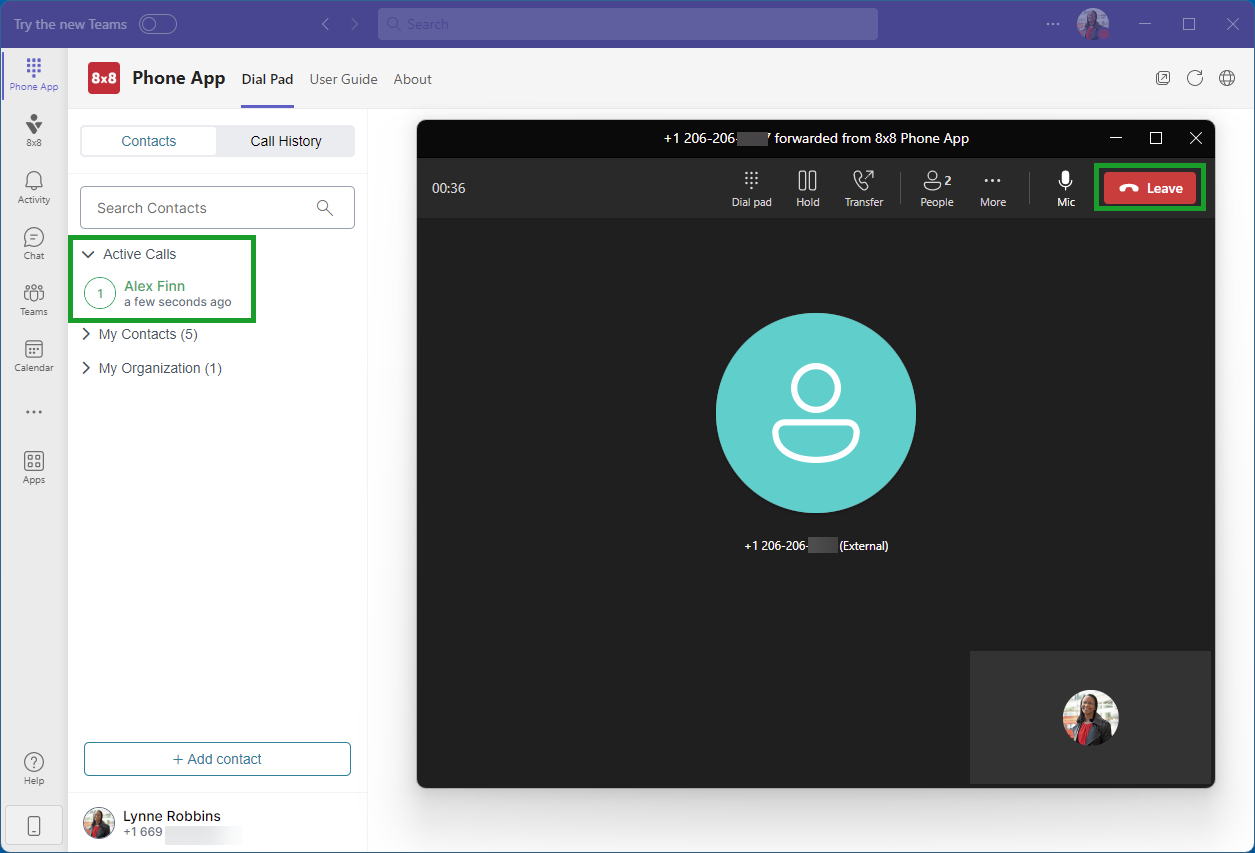
Note: When a call is in progress it will show in your active calls list on the Contacts/Call History pane.
- When you are ready to end or leave the conversation click Leave.
You can only receive two calls at a time—one active call, and a call on hold. When in an active call, if you are offered another call and you answer, the first call is automatically placed on hold.
To call another Microsoft Teams user via the Phone App, you must meet one of the following conditions:
- You know their assigned phone number—manually enter it in the Phone App’s dial pad to place a call.
- You have the Microsoft Teams user's phone number or extension saved in your Microsoft Outlook/Exchange contact directory.
- You had a previous inbound/outbound call with that user via Phone App, so you can quickly redial it from the history section.
Receive calls
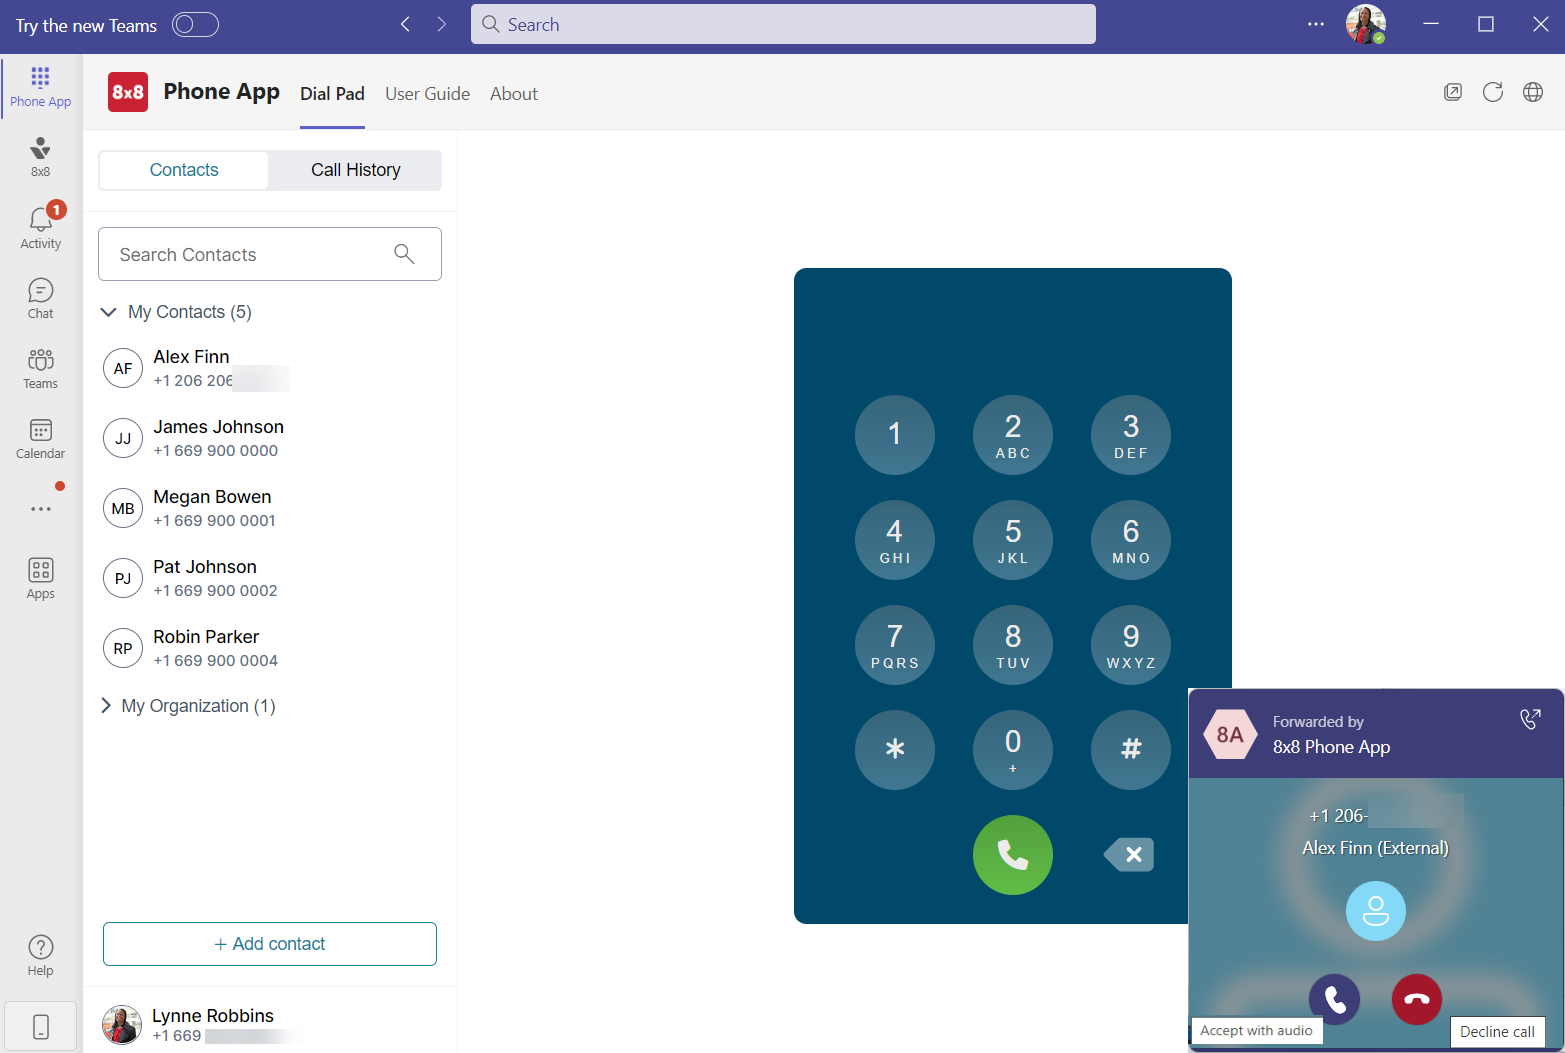
When you receive a call in Phone App, you are notified via a call card that displays on the screen. The call card displays the caller’s phone number, and the caller’s name if the number already exists in your contacts list. When you receive a call, you can:
- Accept with audio: You can begin speaking with the caller.
- Decline call: The call is sent to voicemail.
Note: To access voicemails, go to: Activity![]() > History > Voicemail. To call back, you must return to Phone App.
> History > Voicemail. To call back, you must return to Phone App.
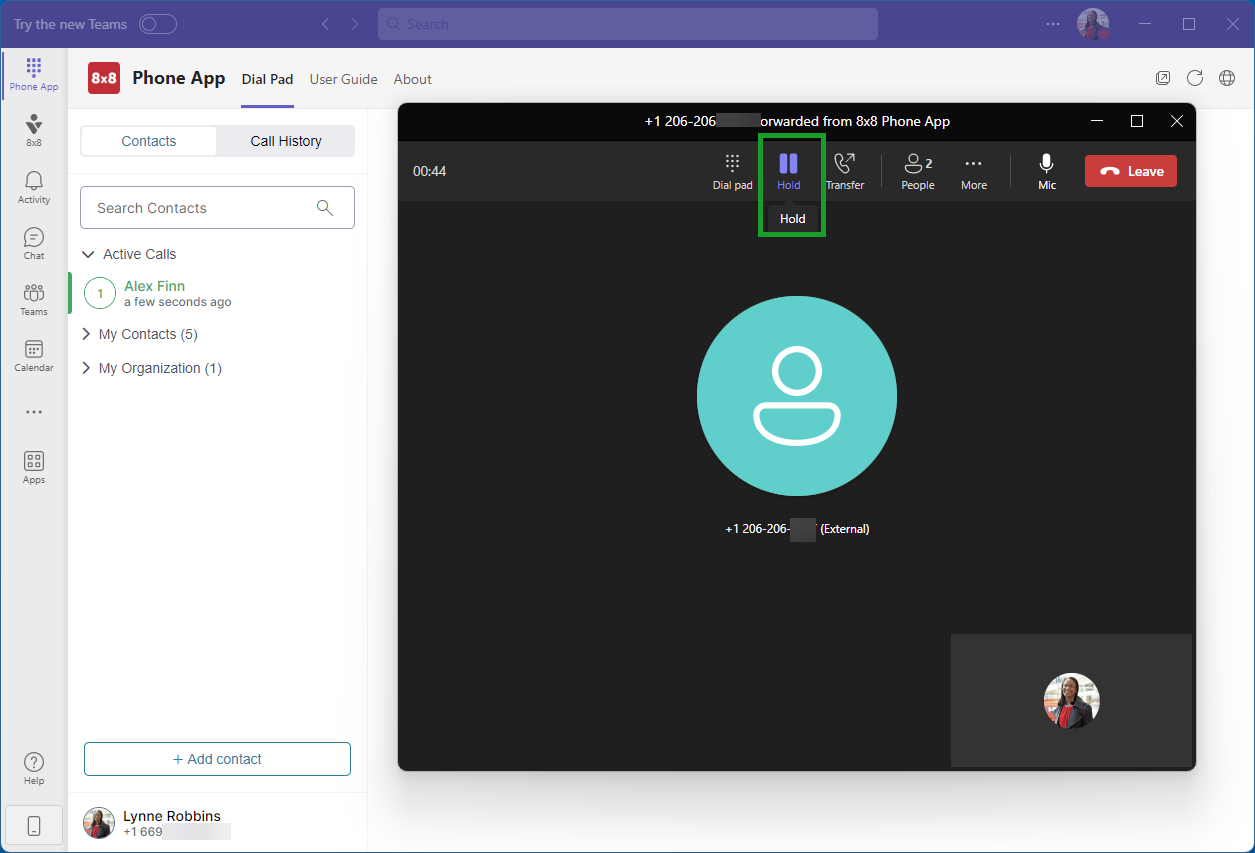
Place calls on hold
To place an active call on hold in Phone App, use the native Teams call hold function. The caller/callee is placed on hold while music plays.
When you are ready to resume the call, click Resume.
Transfer calls
Let’s say you receive a call intended for a specific member of your department. You can simply transfer the active call to another colleague or consult before transferring.
To transfer a call to a Phone App contact:
- While on an active call in Phone App click More
 icon next to the name or number of the caller and Transfer.
- Choose or search the contact to make a direct call transfer.
- Click Transfer.

The call transfers and you are disconnected from the call.
To transfer a call to a Teams user:
- While on an active call in the native Teams Calling window you can click Transfer and choose Transfer.
- Type in the name of the Teams user you wish to transfer the call to, and click Transfer.
The call transfers and you are disconnected from the call.
Consult and transfer
There are several ways in which you can consult with another person before transferring a call.
To consult via a Teams audio call then transfer:
- While on an active call in the native Teams call window click Transfer and choose Consult then transfer.
- Search the name of a Teams contact and select them.
- Click on the Chat dropdown and select Teams audio call.
- A Teams call window will pop up.
- Click Transfer in the new Teams call window.

The call transfers to the other Teams contact and you are disconnected from the call.
To consult via Teams chat then transfer the audio call:
- While on an active call in the native Teams call window click Transfer and choose Consult than transfer.
- Search the name of a Teams contact and select them.
- Click on the Chat button and chat with the person you are transferring the call to.
- Click on Transfer to transfer the call to the other Teams contact.

The call transfers to the other Teams contact and you are disconnected from the call.
Track call history
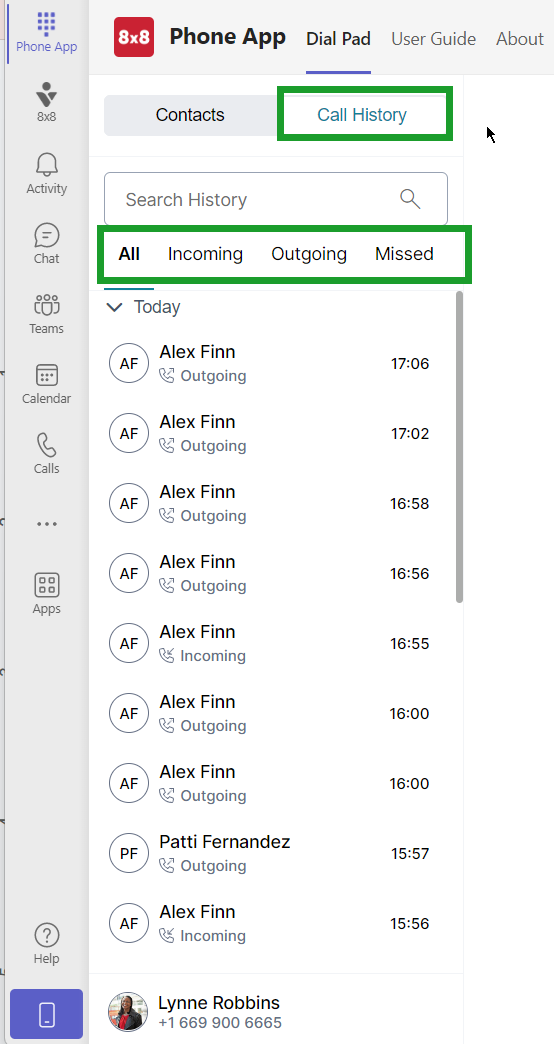
Your recent PSTN call logs are listed in the bottom section of the Phone App. You can select:
- All: View all calls.
- Incoming: View only inbound calls.
- Outgoing: View only outbound calls.
- Missed: View only missed calls.
- Search History: Search for a name or phone number in your call log. As you type, the search results for contacts narrow down in a list below the search box. If your search doesn’t generate any results, the system displays No Records Found in the list.
Click the Dial ![]() button next to the contact to place a PSTN call from the call history section.
button next to the contact to place a PSTN call from the call history section.
Note: The call history retention period is 12 days, with a storage capacity of up to 100 calls.
Access contacts
To access your contacts in the 8x8 Phone App for Microsoft Teams, click Phone App ![]() from the sidebar, and on the left there is the Contacts/Call History pane, click on Contacts.
from the sidebar, and on the left there is the Contacts/Call History pane, click on Contacts.
The Contacts list in the Search Contacts ![]() section displays the contacts saved in the Phone App or in Microsoft Outlook. These contacts must be associated with a phone number.
section displays the contacts saved in the Phone App or in Microsoft Outlook. These contacts must be associated with a phone number.
Note: The contacts in the My Organization section appear only when your Microsoft administrator associates phone numbers with licensed users on your Microsoft service. You cannot modify these contacts.
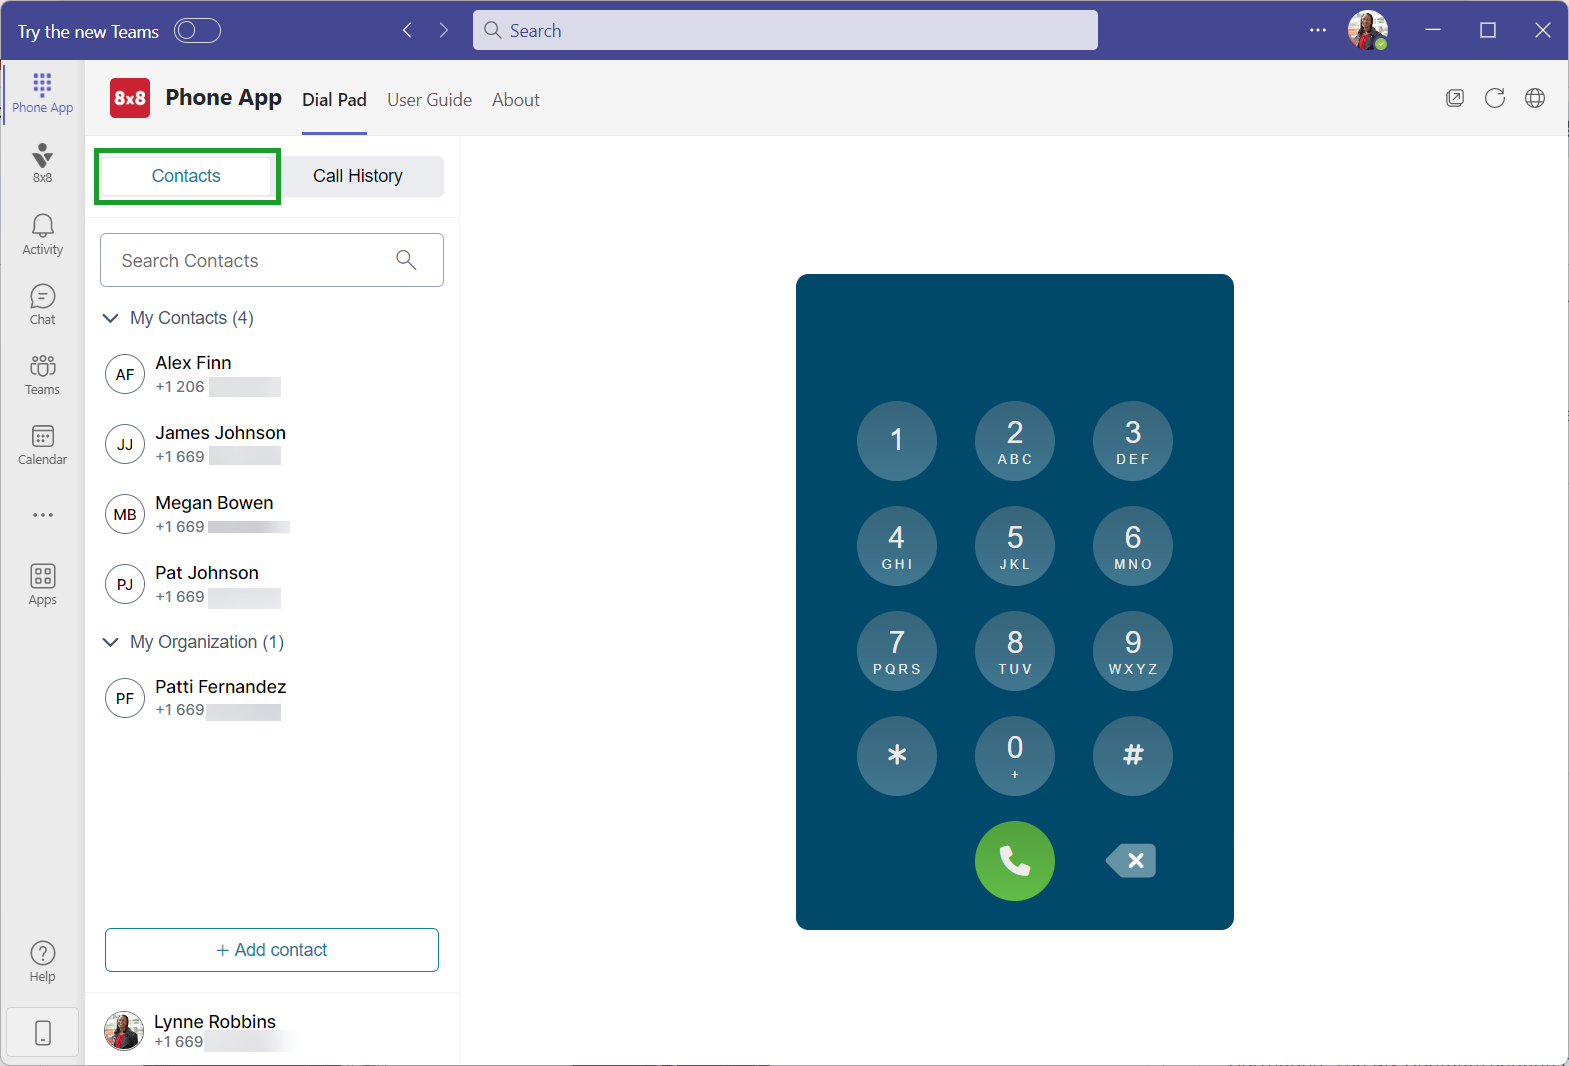
Note: You cannot access the Global Address List from Phone App.
Search contacts
You can easily access contacts in your 8x8 Phone App for Microsoft Teams.
To search for a contact in Phone App![]() , go to the Contacts/Call History pane.
, go to the Contacts/Call History pane.
The Contacts/Call History pane automatically groups you contacts in two categories:
- My Contacts: shows contacts from Outlook address book and those added manually in the Phone App.
- My Organization: shows contacts from your organization’s directory.
Scroll through the available contacts in the list, or type their name/number in the section’s header. As you type, the search results narrow down in a list below the search box.
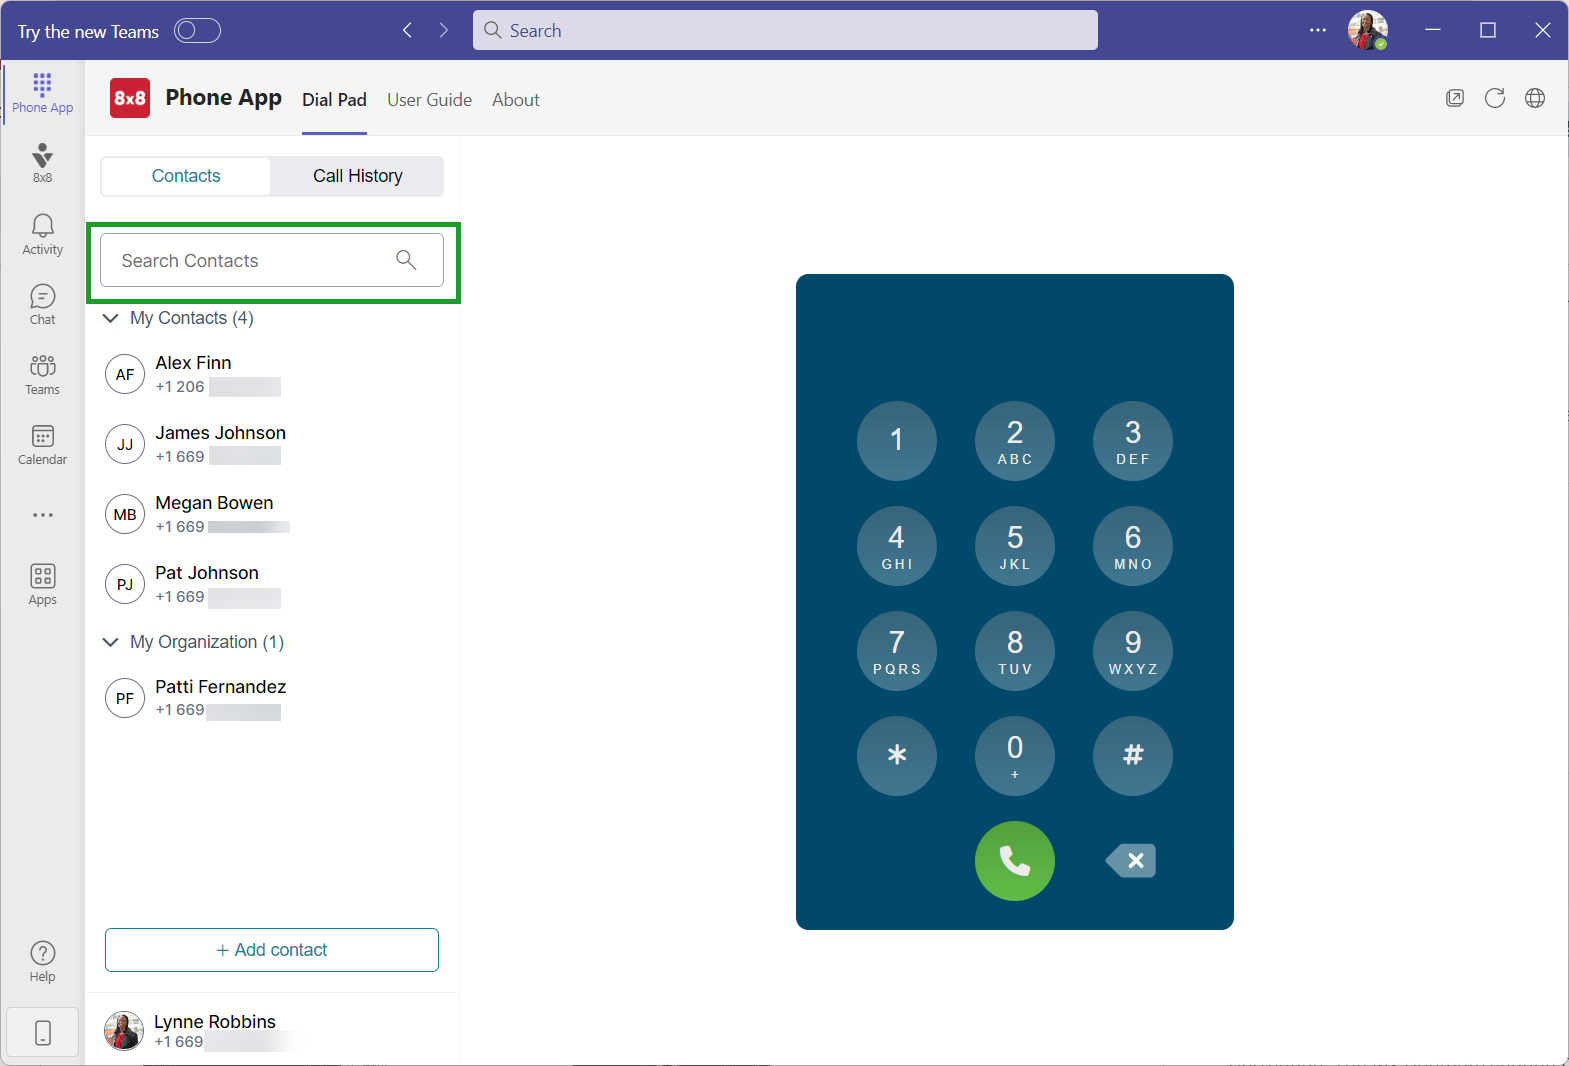
Note: You can search for contacts by name or phone number.
Note: You can only access contacts saved in the Phone App. in your Microsoft Outlook, or in the Microsoft 365 admin center.
Note: You can pin or unpin a contact from your Contacts/Call History pane by clicking ![]() icon next to it and then Pin or Unpin to have it removed from your Contacts/Call History pane.
icon next to it and then Pin or Unpin to have it removed from your Contacts/Call History pane.

Add contacts
Let’s say you’re always dealing with prospective clients and keeping track of their contact details is very important. To ensure you can easily keep track of the people you communicate with outside your organization, you can add people to your contact list in bulk or individually.
To add one or more contacts to your My Contacts list:
- In Phone App
 , go to the Contacts/Call History pane > +Add contact.
- In the window that opens:
Add the contact information for the required fields, and click Add.
-OR
- Click Bulk Import, then use either the Drag or browse option to import your CSV file.
Note:Contacts will be saved under My Contacts, and will be added to your Microsoft Outlook directory.

Edit contacts
Note: You can only edit the contacts available under My Contacts that you created in Phone App or Microsoft Outlook.
Let’s say you received a notice from one of your contacts that they will be updating their work phone number. You can easily edit a contact’s details with a few simple clicks.
To edit a contact:
- In Phone App
 , go to Dial Pad > Contacts/Call History pane, and find the desired contact.
- When the contact displays in the list, click
 icon next to the contact’s name.
- From the drop-down list, select Edit Contact.
- In the Edit Contact window, make the necessary changes.
- Click Save.

Delete contacts
Note: You can only edit contacts available under My Contacts that you created in Phone App or Microsoft Outlook.
Let’s say you added a personal contact to your contact directory, and you would now like to remove it from the list. You can easily delete a contact’s details with a few simple clicks.
To delete a contact:
- In Phone App
 , go to Dial Pad>Contacts/Call History pane, and find the desired contact.
- When the contact displays in the list, click
 icon next to the contact’s name.
- From the drop-down list, select Delete Contact.
- At the prompt, click Yes, delete the contact.

The contact is permanently deleted from the My Contacts list and from your Microsoft Outlook contacts.